
When a home starts to feel drafty or energy bills climb, windows are often the first suspect. But replacing windows is a major investment, and guessing where the problem comes from can lead to unnecessary costs. Before committing to new units, a thermal camera can help you see exactly where heat is escaping and why it is happening, according to Natural Resources Canada.
Once found only in professional energy audits, thermal cameras are now affordable and easy for homeowners to use. A quick scan can reveal whether the glass, the frame, or even the wall around the window is contributing to heat loss. This guide explains how thermal cameras work and what those hot and cold spots really mean for your home.
Understanding Thermal Cameras
A thermal camera measures the infrared radiation that all objects emit, as explained by ASHRAE. It converts those readings into a color image that highlights warm and cold areas.
- Warm areas show up as reds and yellows
- Cool areas appear as blues and purples
On a cold day, a simple scan across your windows can immediately reveal where cold outdoor air is entering or where warm indoor air is escaping. It turns invisible drafts into clear, visual evidence.
Why Thermal Imaging Helps You Make Better Decisions
Thermal scans reduce guesswork during a window upgrade and help you understand what is really happening behind the walls.
- Pinpoint the problem: Cold spots in the center of the glass indicate a failing insulated glass unit. Cold lines around the frame suggest air leakage.
- Avoid replacing windows unnecessarily: If the wall around the window is colder than the window itself, insulation is the real issue, not the window.
- Choose the right installation type: A sash insert will not solve frame leakage. A full-frame replacement might be necessary if insulation around the opening is compromised.
- Get clearer estimates: Sharing thermal images with an installer helps them understand the issue and provide more accurate recommendations.

Comparing Home Diagnostic Methods
| Parameter | Thermal Camera Scan | DIY Feel Test | Professional Energy Audit |
| Cost | Medium (rent or buy) | Free | High |
| Accuracy | High | Low | Very High |
| Complexity | Medium | Easy | High |
A thermal scan offers strong diagnostic power without the cost of a full audit, making it a helpful first step.
How to Read Hot and Cold Spots
For the clearest results, there should be at least a 10 to 15 C difference between indoor and outdoor temperatures. Once this temperature difference is present, pay attention to these patterns:
- Cold spot in the center of the glass: This indicates a failed insulated glass unit. The seal has likely broken and the insulating gas has escaped.
- Cold streaks along the edges of the frame: This is a classic sign of air leaks, noted by the University of Massachusetts Amherst Building Science Center. It can mean the frame was installed without proper insulation or that the weatherstripping has failed.
- Cold areas in the wall around the window: This suggests missing or compressed insulation in the wall cavity. A window replacement alone will not fix this problem.
Common Mistakes When Using a Thermal Camera
Thermal cameras are sensitive tools, and a few mistakes can lead to confusing results.
- Interpreting reflections as cold spots: Glass can reflect infrared radiation, which may make another cold surface appear on the window. Scan from different angles for accuracy.
- Using the camera on mild days: Small temperature differences will not reveal meaningful patterns.
- Misreading structural patterns: A cold vertical line may not be a draft; it could be a stud or an uninsulated section of the wall.
- Scanning too small an area: Always scan the entire window, the trim, and surrounding wall to understand the full picture.
DIY Scans vs Professional Energy Audits
Some homeowners prefer to hire a professional. Others start with a DIY scan and upgrade only if needed.
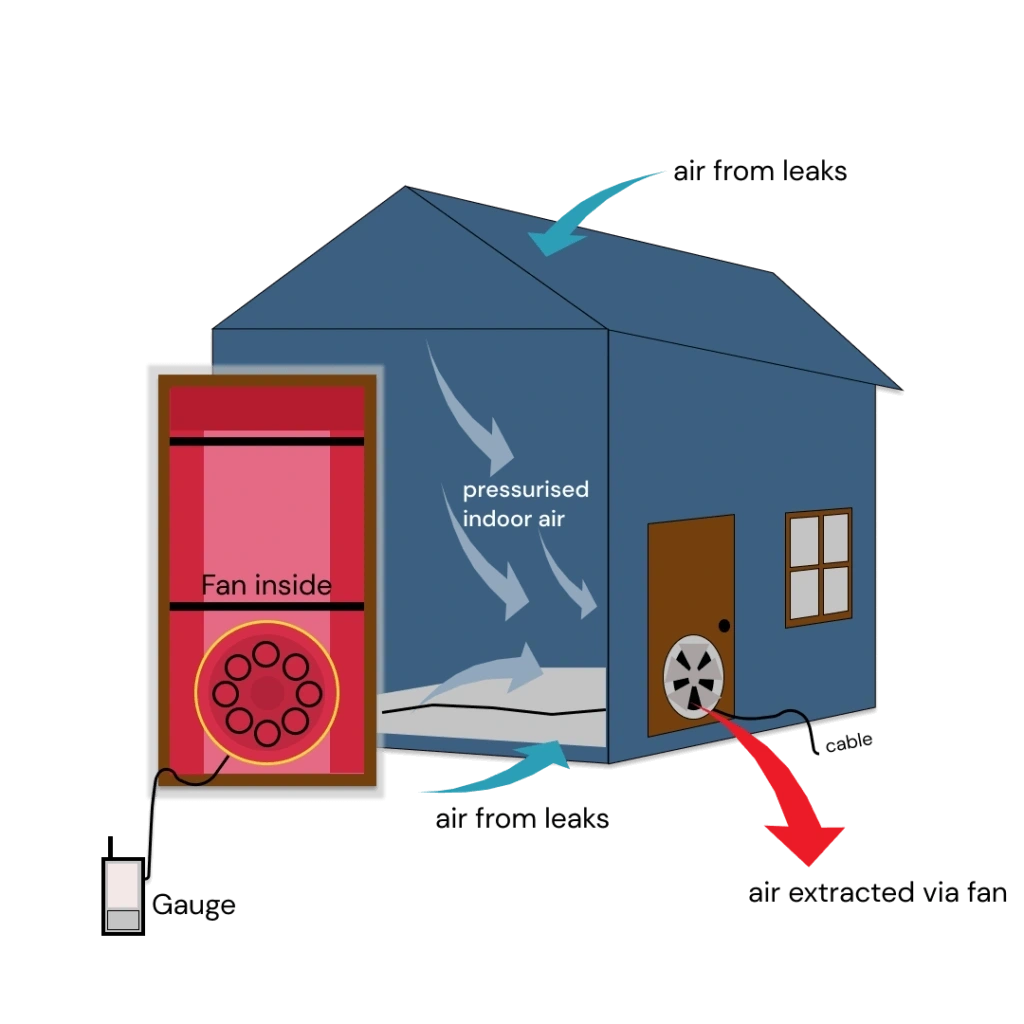
- Professional view: Energy auditors often use blower door tests, which temporarily depressurize your home, a method discussed in official research from the International Energy Agency. When paired with thermal imaging, leaks become extremely obvious. This method is the most precise.
- DIY view: Entry-level thermal cameras and smartphone attachments offer a practical, affordable way to identify major issues. While not as comprehensive as a blower door test, they capture enough detail to guide window replacement planning.
Frequently Asked Questions (FAQ)
1. What should I consider when using a thermal camera to plan replacements?
The most important thing is to use it on a very cold (or very hot) day. Scan the entire window unit-the glass, the frame, and the wall around it-to see if the problem is leakage or a failed glass unit.
2. How do I choose the best thermal camera?
You do not need an expensive, high-resolution camera. A simple, entry-level thermal camera or a smartphone attachment is more than sensitive enough to find the cold spots around a window.
3. What are the advantages and disadvantages of this method?
- Advantages: It provides instant, visual proof of heat loss. It pinpoints the exact location of the problem, allowing for a more accurate repair or replacement plan.
- Disadvantages: Requires a significant temperature difference to work. Can be fooled by reflections on glass. Cheaper cameras may have lower resolution, making it harder to interpret small leaks.
Conclusion
A thermal camera provides clear, visual insight into how your home loses heat. Instead of guessing which windows need attention, you can see the exact location of drafts or insulation gaps. This information allows you to prioritize your budget, choose the right replacement method, and discuss solutions confidently with an installer.
hen planning a window upgrade, a thermal scan is one of the most effective tools you can use to ensure your investment delivers real improvements in comfort and efficiency.